Monday, April 7, 2014

The 8th Grader Saves the Bay...In Luray?

I come from a long line of Conservationists. My grandfather was always trying to teach us the names of plants and trees around us and taught us how to work the land with respect. He was incredibly well versed in the Native American culture and taught us to be at one with our environment, to make decisions that would care for the world around us and preserve it's beauty for the people to come after us. My dad took pruning sheers to the Lake to trim the beach shrubbery and get it healthy again. He would have us pick up trash were ever we went and pounded the mantra of "leave no trace" into us with regard to any natural location. I am personally a big fan of public recycling and composting. I even recycle my computers and I am the reason there is never any space in the grocery store containers for your plastic bags. I am borderline fanatical about recycling plastic bags. 

But I had no idea just how much all of this had filtered down to my children. 

Last year, my then 7th grader took Environmental Science in school. They had several water quality experiments and a great field trip involving wearing hip waders to take water samples out of the middle of a stream. I highly recommend chaperoning a field trip where you get to watch a bunch of 7th graders flopping around in a river wearing hip waders. Very entertaining. My daughter was so captivated by this experience, that she chose to do her research project on water quality and tested the quality of the water in the stream behind our house and helped clean up a few other streams in our area. 


Fast forward a year. The same child gets assigned 5 hours of service to be performed for the cause of her choice. For some reason, I was surprised when she chose the Save the Chesapeake Bay Foundation. Sometimes we moms can be a little thick headed.  I was thinking of feeding the homeless or something a little more people oriented. But she was underwhelmed by this. Water quality had become a bit of a personal mission for her. So I told her to go ahead and figure out how to Save the Bay.

About 2 days later she comes in "Mom! Mom! Can we go build a riparian border on the banks of a river this Saturday? It's almost the end of the semester and this is the only activity they have before the service hours are due!" Um...riparian boarder?...what? Because I didn't have anything else going on during soccer season the first weekend of April, right? (And yes, this little shenanigan was part of the reason I ended up postponing my workshop.)

But then I stopped for a second. And thought about all the times I had encouraged her to "find her bliss." Here was my 8th grade daughter doing all the work, sending out all the registration emails, finding an event that she was really interested in to help a cause that she was completely committed to... I figured I could at least look at the info on the promotional page. 

The event was a great time, not an easy date, but do-able if I made some arrangements, and then I looked at the location, Luray, VA. That's about a 1hr and 45 min drive. And the event started at 8:30am. So I would be leaving at 6:30 am on a Saturday morning to drive to a farm to plant trees and shrubs on a stream bed for 5 hours to then drive the almost 2 hours home. I looked up at her, her young eyes glowing and full of enthusiasm and hope. 

I almost said, "No", but then remembered a book I'd read about 5 years ago called Planting Noah's Garden. I had become completely enamored with the idea of making a naturalized garden, but had never had the opportunity to do it. Particularly the chapter on restoring a stream bank. And here was my big chance! 

So I told her to get us all registered. She squealed in the way only 8th grade girls can and ran off to the computer. And I found myself with a little ember of excitement in my own heart. 

Saturday proved to be a glorious day. The weather was clear and cool and we woke early and sped off towards our pending adventure with great anticipation. There is just something magical about going on a road trip. The novelty of it. The sense of adventure. The views as the world goes speeding by. It is just the best.

We made it there in good time. And we didn't even get lost due to good email directions by Robert Jennings, the director of this event and my daughter's newly acquired map reading skills. 

We turned at an event sign in the road, followed a gravel road between to berms 
and pulled up to see this:


Pretty bleak.

It was pretty much devoid of any kind of vegetation. The area around the stream had been used as a feed lot for 200 head of cattle for years and years. Anything green or alive had been eaten or trampled a long time ago. By the time we got there the only thing living on that ground were the starts of native grasses reintroduced by the White House Farm Foundation that had bought the farm in 2012 with the intention of restoring it and using it as a model of sustainable agriculture and ecological practices. 

Here it is in color. And I promise I didn't shoot it in B&W just for dramatic effect, although it is pretty dramatic. I actually couldn't see the photos on my screen because of the angle of the sun and didn't realize I was still in the "Copy" setting until after I took these. 

Here you go, in Technicolor.


You can totally see the potential of the place. The site is so nicely laid out with the berms and the curve of the stream. It could be rather picturesque. But you can also see how lacking it is in vegetation. When the WHFF people bought the property, there was nothing but dirt and exposed bedrock. Everything else had been stripped or eroded. My "before" pictures are after two years' worth of regrading the hills, adding back all the lost topsoil, reseeding the grasses and adding jute netting to prevent all that work from eroding in the rain, wind and snow, and then clearing back any weeds that had sprouted up along the stream banks. Whew! It makes me tired just thinking about it.

Fortunately, they saved all the quick fun, rewarding stuff for us volunteers. We got to plant trees. 


After telling us the nature of the agencies involved (Save the Bay, White House Farm Foundation, and a conservation oriented branch of the USDA) and how all the trees we were planting would effect the water quality and ecosystem of the 2 acre stretch of stream we were repairing, we learned the right way to plant a baby tree. (Robert, if you're reading this, please remind my what this long suffering man's name is and who he represents? I'd love to give everyone credit, but it was pretty early when you all were talking)


Step one: See how deep your hole needs to be. You figure this out by looking at the roots of the sapling. the place where the roots stop and the bark changes and flares a little is the perfect depth.

See that spot where the roots stop growing out and there's a bump and then the bark gets smoother? That's what you are looking for.


Step 2: Dig your hole. You want to go a bit wider than the tree so you can loosen the soil around the baby tree to make it a bit easier for it to spread out its roots. the organizers had made siting easy for us by previously spray painting orange dots on the ground to mark where the trees should go. 


Step 3: Remove competing vegetation, to give the tree it's best chance at getting water and nutrients. You undercut the grass about an inch and a half to get rid off the roots, then you remove some of the dirt and just flip over the grass chunks, grass side down to replace and keep the ground level around the tree.


Step 4: Place tree in the hole and cover with dirt. it works better if you break up the dirt clods with your hands and make sure that the dirt is packed, but not compacted when you are done. And be sure to keep your tree roots below the ground and the transition line of smoother bark right at the ground level, not too deep, not to shallow.


Step 5: Add protective tubing. This plastic-y tubing protects the tree from being eaten by animals like deer, and also acts as mini greenhouse. You just carefully slide it around the little tree and then push it into the ground. Be sure to put the flared side up and the stake ties facing down stream. If you twist and push about half way down the tube, it goes in the ground "like butta". Well at least it did for us, but it had been raining for a week before the project so the ground was nice and soft.


Step 6: Add a wooden stake to stabilize everything. This is where a sledge hammer or rubber mallet come in handy. You run the wooden stake through the open nylon ties and then hammer it into the ground until it's about 1-2 in higher than the top tie. It is sometimes helpful to hold the tubing away from the stake so you don't smash the tubing. It can take some pretty good whacks to get the stake down as far as you want it to go, even if the ground is soft.


Step 7: Cover the surrounding area with landscape fabric to help keep down the weeds. This ensures the fledgling tree the best shot at all the water and nutrients the ground has to offer. The black fabric shade the ground, helping to prevent weeds that might grow faster than the tree or take away water or minerals away from it. These guys think of everything!


The landscape fabric was cut into 3-4 ft squares with a slit right in the center. Making sure the fabric was shiny side up, you slid the slit over the tube and stake and then pinned the corners down. You rolled the fabric over 2 times to ensure that the staple wouldn't rip through and then pinned the corner with a u-shaped staple that was about 6-8 inches long. Most of the time you could just push them right through the fabric and into the ground, but if there were rocks or the ground was a bit harder, you could step on them or hammer them down.


Step 8:Stand back and admire your tree. If you finish all these steps, you should be pretty proud of yourself. You have just made a major investment in the future. Be ready to do some daily watering, if this is in your yard.

After our little demo, they put us in pairs, handed each team a shovel and a sledge hammer and put us to work. One person dug the hole while the other got the tree and the supplies. They varied the variety of tree you planted so the whole grove will grow up to be completely diversified. 

Shall we see how the 8th grader did planting some trees?

 Orange marks the spot. 
Nice hole depth. Pretty good technique with the grass removal. Not too shabby.
And here is the tree, all nice and tucked into its new little bed.
Action photo as the 8th grader starts laughing because she almost hits herself in the face with the sledge hammer. Easy girl.
 Ooo...Photo Op with Robert Jennings, the director of this project. That sure was a man who loved his job. Always a happy thing.
And now the rolling of the landscape fabric. Where did you put those staples, Mom?

Oh how I love Nancy the Northern Red Oak! Grow big and strong little tree!


The girl and I planted 14 trees and 25 shrubs in the 5 hours we worked. There were about 20 volunteers there, so do the math on that one. I was astonished at how much our little group got done.


Remember where we started? 


Crazy, right?

Here's a few more "afters":


These may not look like much to you, but I see a gorgeous grove of trees in 10 years, shading the water, cleaning the soil, and possibly making this a home for trout and other fish and wild life. I can smell the green when I look at these photos. It just feels like pure optimism to me.

In any case, it was one of my favorite days in a long time. Every so often we'd look at our watches and being amazed how much time had gone by without us knowing it. I just got lost in the work and ground and the air. I felt part of something bigger. And the 8th grader just grinned and grinned. If it makes my daughter happy all the way to her liver like that, I am all for Saving the Planet. One tree at a time.

I'd love to hear about your conservation or service adventures. Leave me a comment.


For more information about the Chesapeake Bay Foundation, click here.
For a list of volunteering opportunities in VA/MD click here

To learn about the history of and mission of the White House Farm Foundation, click here.


Talk to you soon,
CM Shaw

Wednesday, April 2, 2014

Let in the Light! I mean, White!

I am not the kind of person most people think of as living in a white space. I thrive on COLOR. In fact, I actually suffer from Seasonal Affectation Disorder during later February and March because it is so cold and dreary and grey. The grass is grey, the trees are grey, the sky is grey. It really does mess me up pretty good. In fact, I actually painted my kitchen ceiling sky blue a few years ago, and having that bright color around has actually helped with the depression. 


Anyway.

Most of my house is painted in some derivative of orange or aqua or yellow. The kid's rooms all have some combination of blue and green. And the play room is this really soft sherbet green, kinda like Daquery Ice ice cream from Baskin and Robins, with all these really bold colored paintings and pillows on the walls and couch.

So when I told my husband a few months go that I wanted to paint my family room white, or rather "Swiss Coffee" (a creamy white from Home Depot), he reached over and felt my head to see if I had a fever. 

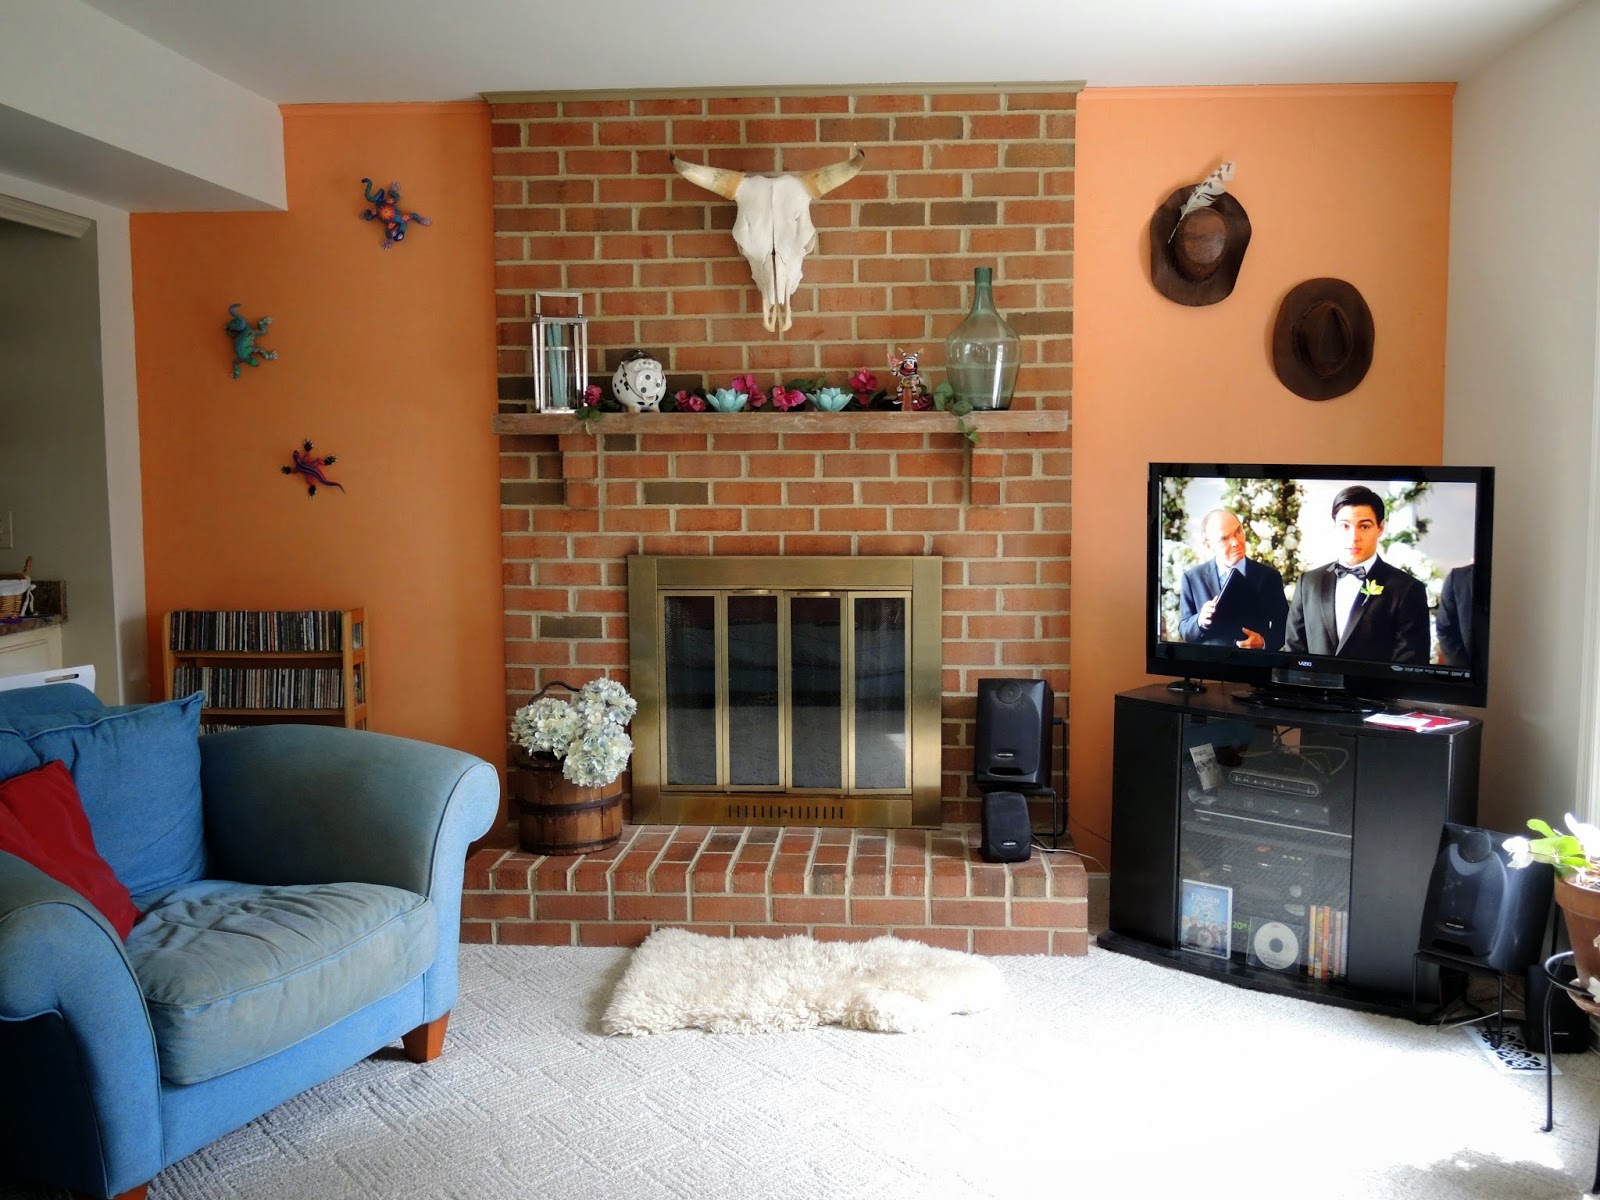
The thing is, I really like white rooms. I have always really liked white rooms. I just didn't realize it until I started looking through all my torn out pictures of rooms. Every single one of them had soft white walls with these major hits of hot color in the art and accents. Like these and this. They all also had natural wood, black wrought iron, and some kind of stone. Boom! The recipe for my family room was born. 

It really isn't that different than what was here before. Let's turn back the clock to Christmas, shall we?


My major issue with this room was the wall color. It was a flat, tasteful taupe. Mots people would have loved it. It was innocuous enough that I lived with it for 8 years. But that room has always been a bit of a cave. Especially in the summer when the giant trees just behind our yard are all leafed out. And anytime it's rainy. We needed something that would bounce light around, but not fight with the other bright colors in the room. 

And I really wanted something that made me feel like I wasn't so far from home. We went to my parent's place in Phoenix where I grew up for Christmas break. It reminded me just how desperately I miss all the stucco and bougainvillea and terra cotta. That what says "home" to me.

Enter Swiss Coffee.


This is not an angle of the room I shoot very often. That may be because it so often looks like a pile of garbage. But here you can see how the white paint accentuates my art and accessories. And it makes my bookcase look so snappy. BTW that was one of my greatest finds ever last summer. It's vintage, solid wood with the original glass panels and push lock hardware. I got it at a church rummage sale for.....$40. I know, crazy, right? It makes me deliriously happy every time I walk in the garage door. Here take a peek.


Who wouldn't feel happy being greeted by this view every time you come in the door? OK, enough of the pretty bookcase. Let's move on.


Here's another seldom seen angle of my room. Mostly because it's hard to get a shot without hte couch being in the way. The trunk holds newspapers. It's my "out of sight, out of mind" trick to combat DK's newspaper piling habit. The print is "Jack Knife" by Ed Mell, one of my favorite painters of all time. Cubism and desert scenes are a match made in heaven! I'm trying to figure out a way to update the frame. Custom mats are pretty pricey, but wouldn't it look sweet with a crisp white mat covering all the surround and a freshly painted black frame? One of these days I'll get my nerve up...


Another fun thing about painting was the chance to move my art around. This gorgeous original, "Aspens," was the basis for my logo and brand. My dear friend Erica Christensen  is the most spectacular graphic artist and paper collagist. (Here is her great blog "The Shady Elm". Here is more of her art and our trip to Lucketts a few years ago) She cut the black portion out as the basis for my logo, and then finished the whole piece for me! 


 I love the way the gold leaf reflects the setting sun. It comes to life and just burns golden. Magic. 


Here's the view from the kitchen. So bright and happy. : ) 


Here's the view back into the kitchen. I love how all the white makes the two rooms flow so nicely. And yes. This is the most comfortable couch known to mankind. And yes it could use a good washing. Hmm... I'll have to get on that.


One of the other things I did while painting was to remove the trim around the paneling next to the fire place. See all that orange Venetian plaster? That's over the top of paneling. I filled in the grooves with spackle, primed it and plastered it the first year we lived here because I hated the paneling so much and didn't have the money or know how to remove it.

So the trim stayed there, simply because we didn't know how to deal with what we might find behind it. And it didn't bother me until last year. Then, suddenly, I hated it. DK wisely talked me into painting it to match the plaster, which I did. And then spent the next year figuring out how to get rid of it. 

So one day, when I was supposed to be home sick, I just tore it all off. And found this.


Yes folks. The genius who built my house decided it was OK to not have the wall and the brick line up. Who does that? Since I refuse to re-install the trim, I will be thinking of a less obvious solution using flat wood most likely, construction adhesive and some faux finishing to make it all disappear. it still looks just like this right now, but you can only tell from the side, so it doesn't bug me.

I fixed the gaps between the wall and paneling by filling the gaps with spackle.  See the picture below. Once the spackle was dry and thick enough to be even with the paneling, I sanded like crazy and primed the whole joint. Then I plastered over the whole concoction. I checked the old plaster last year to make sure the stuff on the wall hadn't faded. And it was still a perfect match.


Here's a few pics to show you how cool the plaster is. I love it. And I highly recommend the experience of plastering. It's kinda like being able to frost your whole wall. Super messy and fun.


Here's the texture up close. You just put it on with the edge of a trowel. 


Here's what it looks like a little farther back. And these are the adventure hats. DK and I would wear them when we went out in the Utah wilds when we were still poor and in college. The feather is from a snowy owl. They were my favorite bird as a kid. And while I never told DK that, he brought it all the way back From Alaska for me when he found it on the ground of a bird sanctuary. Total keeper, that man.


This is my spring mantle display. It's a little spartan this year, but that's kinda where I am right now. I do love the bougainvillea garland. I bought it from Pottery Barn on clearance a long time ago. I so wish I would have bought 2 more. Oh well. Something about the fuschia just takes me to my happy place.


I love my piggy bank. I totally have a thing for black and white, mostly in the form of cow print. The contrast just makes my eyes happy, I think. And the candles are chalk painted. I needed aqua candles and I couldn't find any. I remembered you could paint over wax with chalk paint, so I busted out the Provence and there you have it. I love how they look! But I've never been brave enough to light them. The lantern was $8 from Home Goods because the glass was broken. A vase from the dollar store fixed that.


I love this old Chinese rice bucket. My mom got it for me for Christmas this year. I am actually considering planting a real hydrangea in it. But I worry how a hydrangea would do indoors.


This is actually a really good picture of my cow skull. It just occurred to me that my children have never named it. How funny. The front door has a name. The car has a name. but the cow skull does not. Go figure. Anyone have any suggestions? My dad bought the cow skull for me at a swap meet in Phoenix from a lady who goes and finds them in the desert. It helps me create the illusion of not being clear across the whole country from my beloved desert. Plus I think it's kind of funny to have a cow skull as decor in Virginia. Most people don't see this one coming. 

Here's another ill-fated cow. My friend picked up this hide for me in Tijuana when we were seniors in high school. Yup. I still have it. It is a little worse for wear I must admit. But it makes a great table runner. And don't you love root baskets? Their so groovy and texturdy. Another Home Goods find.


So that's pretty much it for now. I have big plans of adding crown molding to the ceiling along the fireplace wall and painting a picture of a sunset for the space between the windows like this one by Lauren Knode. I am delighted though, at how much more at home I feel with each thing I have been doing. 

What have you guys been doing to your houses to make them feel more like home? 

Take to you soon,
CM Shaw


Tuesday, March 25, 2014

New Workshop! Egg and Nest: Make Your Own Chalk Paint and Glazes


CM Shaw Studios Workshop: 
How to Make your Own Chalk Paint 
and Work With Glazes
UPDATE: CLASS POSTPONED
Just as all this snow has been super unexpected, I've had some things crop up out of the air. The class needs to be postponed until a bit later this season. So sorry for any inconvenience this causes you.

When: Postponed

Where: TBD

Cost: $85 ($75 with *discount code if you register by April 1st)

*enter discount code EGGANDNEST at checkout


This winter has been so long and cold. Why don't you come and brighten things up by learning to make your own chalk paint? Just think of all that latex paint sitting in your garage, waiting for a new life as chalk paint. You'll use two different methods to make chalk paint and I'll share my own experiences with a few more. Once we're all stirred up, we'll learn a simple driftwood glazing technique. 


You could make your whole house look like a Restoration Hardware ad.

Once you are feeling more comfortable using a glaze, we will practice using the new paint to create layered glazes and make realistic looking faux eggs. 

We'll use three different techniques to 
make our little eggs look real.


You can do this! 


It just looks hard.


When you are done, you'll have something like this to take home and look at 
instead of the snow.


So come paint with me and let's forget about the cold and welcome the spring. 
Just in time for Easter.


  • All materials will be provided. 
  • Please wear painting clothes that can get messy. This class is not one for your Sunday best. 
  • You will also go home with a Free sample of Webster's Chalk Paint powder and a wax sample, which should be enough to chalk paint a small bench or med-large picture frame.

Register here


Can't wait to see who comes!
CM Shaw

Tuesday, March 18, 2014

What is Joy?

I have been living the life of a creative business owner for 3 years now. And it has been one of the most amazing things I have ever done. My life has used me up every day. But while I have enjoyed all the growing and stretching, I realized there was a deep sadness growing inside me as well. 

In order to get everything done, I had to commit to projects months in advance. I had to live by my schedule book every second of everyday. I had to pray that the Lord would help me to know "what to do when" over the course of my day so I could get it all in. And I almost always got it all in. And the days I didn't, that was OK too.

But there was no spontaneity. I would wake up with an idea I wanted to try and I'd have to write it down and hope I got to it sometime after the barn sale was over. If my kids wanted to pick apples during barn sale season, we had to give up a soccer game or something else on a Saturday to make it happen, and most of the time the opportunity cost was too great. There was no freedom. 


And for me, that is a problem.

I kept wondering where the joy was that everyone promises you comes when you start doing what you love. It reminded me of a time not so very long ago, when my children were small and needed a tremendous amount of my time and energy. I felt suffocated by their needs and my inability to be what I'm like. I felt very little joy then. 

These two periods of my life only have one thing in common. They left me very little freedom. They required a great deal of structure and self control on my part all day, every day. And that is not what I am like. It is the opposite of how I see myself. 

And yet, I feel full of gratitude that I was able to have both stages. "Full" is not a big enough word. I am completely overcome by the gratitude I feel for having been able to stay home and raise my children myself. And I am still astonished and filled with wonder that I am allowed to take my life on this course of barn sales and art and blogging. Yet both periods have been excruciatingly difficult for me. What is the source of the gratitude I feel now?

I have been thinking about that a lot lately. And I got my answer from the most delicious source. The most refined and delightful octogenarian I know, my sweet friend JM.

As you guys know from my trip to Groundhog Mecca last year, my birthday is Feb 2. Well this year, the party was a bit more toned down. In fact, with teacher work days and my kids home the two weekdays before my birthday, two parties for kids to get to stacked across Saturday (making it difficult to do anything exciting), and the first Sunday of the month being a day I fast for the first two meals of the day and Super Bowl Sunday to boot, I was pretty concerned I wouldn't be able to celebrate at all. But a week before The Day, I got smart. I asked JM to be my guide at the National Gallery of Art the Tuesday after my birthday. 

JM has spent her entire life filling her mind with beauty and excellence. She taught for years and years in the public system, preferring to be in areas where the kids had less at home and really needed her help lighting that candle of learning in their hearts. She has spent so much time in the best museums and galleries of the world, the masterworks have become her friends. As an aspiring artist, I would be a fool to not spend time listening to this woman. And I got to spend an entire day with her, geeking about about great art. It was quite the birthday gift.

As I was driving her home, I finally had the presence of mind to ask her the one question I had prepared in advance. "JM, what do you think joy is?" She thought for a minute, surprised by the question. I can't remember her exact words, as their meaning came across to me more in pictures and memories. 

As we talked about it, I saw the day I turned 40. Two girlfriends and I headed up to a charming town, a village really, to go antiquing with my then 3 year old daughter in tow. My friends had fallen in love with a shop selling vintage jewelry, so I left them there and took my Little to get a snack at the nearby convenience store.  As we walked along a small highway, snow neatly along the roadside, I was completely taken by the moment.  It was a perfect midwinter day, crisp and clear, but not uncomfortable in our cozy coats. The sky was that idealized sky blue from picture books and the sun shone merrily, glinting and sparkling off the snow. We walked past small houses made from the stones cleared from the land by the first people to live there and wondered about all the lives those houses had kept protected. I remember the warmth and fun of my daughters's small hand in mine as we walked, seeing the pleasure in her eyes of being included on a "big girl date" with mommy and mommy's friends. I can remember purposely memorizing that moment with my mind as I realized there was no where in the world I'd rather be than right there, right then. 

And I had 100 other moments just as glorious as I looked back across my life, in case this one wasn't enough to convince me.

What I learned from JM and my own memories is that I was looking for the wrong thing in the wrong way. Somewhere along the way, I had decided that "Joy" was earned by being a good person and that it came across as a constant feeling of happiness and well being. This distressed me, because I had been doing things that were very hard for me and making huge sacrifices for the good of those around me for a very long time and my well being seemed to come and go randomly. Surely I had earned "Joy" by now? (Don't you love the sense of entitlement there?)

But my friends, true joy is a gift of this life. It can be cultivated, but not earned. Anyone can feel it, regardless of who they are or what they've done.


True joy must simply be noticed. 

It is present so very often, if we will just see it and recognize it. It is those beautiful moments, both simple and full of wonder that make our heart beat fast and our eyes tear up with pride or amazement or wonder. It is a fleeting thing in time, but if recognized can live in your heart as a part of you. 

It was such a relief for me to realize I wasn't "Doing it Wrong."And I connected that the reason I feel such gratitude for those difficult parts of my life is because somehow I managed to notice some of the joy along the way. I showered my Littles with flowers as the petals dropped in the spring. I blew bubbles with them and watched the colors change from green to blue to purple to magenta as they floated through the air and popped. I watched their world grow as we made cookies together and as I helped them learn how to read and grew flowers and food in the garden. I got to see the excitement and sometimes the tears in the eyes of my artists as I handed them the first check they ever got selling things they made. I've stared at my barn sale all beautifully staged and hear the shoppers comment about how extraordinary it all is, validating all my effort to bring it into existence. I get to hear my customers tell me how looking at a piece of art I made makes them happy every. single. time. they see it, even after owning it for years.

These moments, my friend, are joy. Your life is filled with them now. And the more you look for them, especially the simple things like how much you want to embrace the person who invented the warm shower, the more you will find them. 


So look. 

They are hidden in the sky at sunset and in your child's "dirty from playing in the forest" hands and in the way your curtains blow just so in the sunlight and in the ice crystals hiding under your mulch. 


Joy is not constant. But it can be all around you, especially when you least expect it.

Joy is just there, no matter who you are, if you have the eyes to see it.

Fill yourself with moments. When you look back, it will feel like 
you have years and years of joy inside you. 

And remember, joy doesn't always make it easier, 
but it sure helps to make it worth it.


I hope this little connection helps you all. It has sure helped me. Thank Heavens for wise women willing to share light on their younger sisters in the world. And thank heavens for all of you, willing to read my ramblings. You too are a gift and I 'd love to hear about your joy.

Thank you all,
CM Shaw


Sunday, March 9, 2014

Waiting for Milk Paint and the "French" Dresser


I got some exciting mail this week. 

Don't you just love exciting mail? I find tracking packages incredibly exciting. You get to watch them go from state to state and wonder how they made such a giant leap from Glendale CA to Tuscaloosa in one day, and then wonder why the heck they went to Tuscaloosa anyway? 

Maybe it's just me and you guys are all sitting there thinking "Ooookaay..." 

Crazy or no, I really do love the anticipation of packages and letters. 
It makes me giddy just thinking about it. 


But this story doesn't really begin with the package, that's the ending. So let's start with the beginning, at Asher Hill Farms. (This is my friends Margaret and Jeff's place. You can read about it here)


The first time I went to Asher Hill Farms, Margaret took me on a tour of her stash. See the barn here? See the attic? The stash fills that attic. Well, it did until we had the barn sale. Now there's a bit of space. 

Part of the tour was Jeff's workshop. In a corner of the workshop was a stack of bed frames, tables, boxes, tools and a vintage dresser. Margaret points at it and says, "Oh that's my trash pile." 


Trash? All these great old beds and furniture. And the dresser? trash? I nearly had heart failure. 

My face must have dropped because she looks at me and says, "You don't think I'm gonna throw this stuff away do you? I just can't use it, so it needs another home. I never throw anything away. Take anything you want."

Anything I want? Will all of it fit in my car?

Then I remembered I'm married. DK is a wonderful, long suffering man, and one of his major purposes in this life is to keep me from getting in over my head. Big job for the poor man. So I took a deep breath and thought, "What would I actually use?"

My daughter could use a new dresser. Or I could paint and sell a dresser at Lucketts. And I can fit a dresser-emphasis on the singular, ONE- in my studio and still be able to walk...So guess what came home with me?

Nothing.

I know. You're shocked. I'm even shocked. But it was before barn sale season and I knew I wouldn't get to painting it until after the show. So Margaret (or rather, Jeff) just let me leave it where it was until I had the time to deal with it. I highly recommend having friends with a big barn who give you stuff and then store it for you. I need to make them a pie.

So fast forward 7 months. I have been to Haven at this point and fiddled with milk paint and white wax. Miss Mustard Seed released a new color, Lavender, with this astonishingly beautiful piece.

Here's the link to the whole post, or just click on the image.

I needed to make something like this! But there was no budget for more paint. Boo. 

So I waited. 

I kept reading Instagram posts from Front Porch Mercantile about milk painting and using hemp oil and white wax and got more and more jealous. Wendy runs the cutest shop in New Brunswick, Canada and is always posting pictures of the fantastic classes she's teaching that I am too far away to take. 

And then there's Finding Silver Pennies. Have you guys discovered this amazing blog yet? Danielle is my hero. The things this girl can do with paint. You need to see the heavily distressed milk painted dressers she did in Feb hereTo.Die.For.

But I am wandering...Back to our riveting story and my quest for milk paint.

I even tried to get the paint for my birthday. I sent DK links to all the colors and products I wanted from online vendors and talked about it with my kids a bunch. I got everything else I asked for, including a gift card for the lumber to make the second 2x4 planting box I've wanted to build for a year, but no paint. Then one day, the clouds parted.

Shaunna West, author of the Perfectly Imperfect blog and owner of a fabulous shop by the same name, announced a sale one all her MMS milk paint products. And she had those cute little electric hand blenders I had seen, but always were immediately sold out. So I finally ponied up and bought the paint. And the hand mixer.


Isn't that just happiness on a tray?

With the paint on it's way, I figured I better go get the dresser.


The thing about this dresser is, it has great lines for this project, but a lot of it is laminate. At least it's old laminate, so I think I can sand it and give it some tooth, but I'm a bit leery about it. There will definitely be priming and sanding and bonding agent used. And I'll keep you guys posted. Then you'll have the inside scoop about whether or not you can paint laminate successfully. And don't worry. I'll tell you if it scratches right off. Either that, or you'll just hear me yelling in my garage.

I have to say though, as I clean this piece, (and it needed a lot of cleaning) I am falling more and more in love with the lines. I love the curvy top...


 And the delicate hardware. I will be replacing the mismatched top knobs with crystal ones. And painting the existing pulls to match the new look.


I love the detailed base and the carved feet. So much room for embellishment here.


And this little ornament on the bottom! So cute!


Yeah, this dresser still has a long way to go, but I can see it in my head. Repair the runners, fill the larger scratches, sand the tar out of everything. Prime it with a stain proof primer that sticks to anything. Bonding agent infused Lavender milk paint (mixed with my darling hand mixer, of course! I can't wait to use that thing) spread liberally everywhere and accented with Pure White ASCP vine style designs and glazed areas. It's gonna be awesome. At least, I hope it will...


What are you guys working on this week? 

Did you get any exciting mail? 

Do you laugh maniacally when tracking your packages? 

Leave me a comment and tell me your story.

Talk to you soon,
CM Shaw

PS. If I haven't talked long enough, and you want to see more of my exciting daily adventures, you can follow me on Instagram @cmshawstudios . I post awesome things there, like smiley faces in the left-over gravy. Cuz everyone needs a little happy gravy, right?

Thursday, February 27, 2014

What I'm Working On ... A Many Faceted Answer for February

People are always asking me what I'm working on. This is a complicated question for me to answer because I am usually doing about a billion different things, in different realms, most of which is not what they would consider "Art". There is usually at least one major organizing project going on. I have a home project "to do" list that's about 200 items long and mostly just waiting for the budget to do it. I am always thinking of new things I want to try in the studio, and I've been writing these down, as it's not really time for me to create right now. I am gathering ideas and energy right now. But that's doesn't mean I'm not going on a whole bunch of field trips to look at stuff and get inspired. I have been doing that almost once a week.

So in an effort to answer the question, "What are you working on?" I thought I'd just take you on a little tour of what I've been doing in February.

Hanging out at the National Gallery of Art

Winter is the best time of year to visit the museums on the National Mall. There are hardly any tourists, (due to our crappy winter weather) so you may be the only person in that entire section of the museum. It's heaven! When I have been going lately, I have worn my "Art Geek" hat. I've been looking for guidance from the Masters, be they Renaissance, Dutch, Modern, or other.

 The layered colors just killed me when I saw this huge piece, Ocean Park No.61,  by Richard Diebenkorn. I had seen it in a book, but I had no idea it was 10 ft by 8 ft! And it just glows, like a pearl. It gave me all sorts of ideas about layering different concoctions of chalk paint and glazes to get different effects; how I could mix pigments into wax to make a glaze become iridescent or pearlized. See what I mean about Art Geeking?

In the Dutch section, I was struck by how Jan Steen used different colors in lighter and darker shades to show the folds of the cloth in his merry painting, "The Dancing Couple." For some reason, that idea is completely revolutionary to me. And when I was telling my very science geeky 14 year old about it, she mentioned that one could take advantage of the Doppler effect and have things closer to you be redder and things farther be bluer to trick the eye into seeing depth. I love it when life just teaches you from random directions.

And then there's Andrew Wyeth. I don't know what it is about this man's paintings, but they have haunted me with their mystery and beauty since I was introduced to Christina's World in 8th grade. In this one, Wind From the Sea, I was looking at how he created the sheerness of the curtains. The more I looked for shading and color clues, (picture me leaning right up to the canvas as the security guard inches closer and closer nervously) the more I realized there weren't any. He simply painted the lines of the curtains and then left at at that. Remarkable effect, wouldn't you say? Transparent looking because there is no paint there? Brilliant! 

See? This is why I go look at other people's art. Because I would never think of this this stuff. Once you figure out what they've done, it seems obvious. But it's the thinking of it in the first place that's the trick. So I just file it all away in the Mental Cauldron and it swims around in there until it decides to combine with something else and emerge again as a loosely formed idea.

Making My Own Chalk Paint

I have been toying with this idea ever since reading this post from Cottage Instincts. So this week I actually tried it. I can't tell you my results, as I am teaching a class on it this coming April 5th (more on this soon. I am super excited about this class!), but I will say it made a mess, and that's always a good thing in my book. 


As a part of my class, the good people at Websters sent me wax and mix in samples for all the students in the class! They are the best! Check them out here. And I promise to do a full review of their products as soon as I have a chance to use them. What's not to love about new brands of art supplies?


Making Things Out of Other Things

Neither of these is a great photo, but they give you an idea of what 
my inner up-cycling bug has been up to lately.

I (well, DK and I. He helped me a lot on this one) made a curtain rod out of pipe conduit. 

I couldn't stand the vertical blinds in my basement any more, both because they were ugly and mostly because my kids never shut them the right way and they were breaking. So DK and I took them down and replaced them with a pipe conduit curtain rod inspired by this hilarious post from Lynne Knowlton's blog Design the Way You Want to Live and some Ikea cotton drapes. 

And don't worry. I have full tutorials in the works for building the curtain rod (you get to use the pipe cutter at Home Depot!), hemming the super long drapes, and adding big fabric stripes to the drapes. Obviously, that last one hasn't happened yet, due to a disagreement with my sewing machine. It needs to go see the sewing machine doctor and then we will resume our merry course together.

I also stripped a tree stump I saved from my friend Rodney's 
wood pile and made it into a plant stand.


I got this idea from my dear friend Brandi's excellent blog, Don't Disturb This Groove. Check the awesome tutorial out here. Brandi's tutorial is so good,  I don't need to write another one here. 

She and I are Instagram buddies and I was completely taken when she posted her awesome "after" pics of this project. I had the stump in my studio, curing. I tripped on it one day and decided the time had come. So off came the bark, and out came the bleach. "Worth it, but nasty" is all I have to say about the process, especially after cleaning out my tub. I also ended up sanding the stump quite a bit after it was dry, which she doesn't cover in her tutorial. I prefer the lighter inner wood to show, as opposed to the darker wood near the bark. And her stumps had no bark to begin with. Lucky!

Painting Things Really Bright Colors

This was one of my birthday presents. My sister always sends me the things that I can't really justify buying, but that I can't live without. This print was just calling to me (It's by Vin Zzep. I like all of his stuff. You can see it here) I knew exactly where I was going to put it; to the left of my desk, so I could stare at it when I got writers block and could pretend to frolic in the grassy fields under the giant fish with a crown. Totally normal, right?

I ran right out and bought a frame at Walmart and got it home and framed it up. And all I could think was "I like this, but the frame needs to be red." So back to Walmart I go, to the blessed spray paint aisle. A little primer, a little spray paint, and Voila! The perfect frame for a flying fish!

And the other day, I was sitting in my chair in the living room looking at my front door. I just KNEW it needed to be electric orange red. So up the paint chips went. DK was leaving town for the week and he made me promise I wouldn't paint it until he got back. So I agreed to just mess with paint chips in various locations until he got back. 

Let's just say 4 coats of paint were on the door and dry within 2 days of his return. And I LOVE it! It makes me feel like it really is MY house. (Tomato Red by Benjamin Moore Aura paint, for those interested.) 

It looked like ketsup on top of the can, and DK said it reminded him of tomato soup, so now our door has been named "Campbell." Gotta love my kids. Who names the front door?

While all this paint chipping was going on, I brought home some aqua chips as well, just in the name of being thorough. I had become entranced by Sherry and John's new entry way from Young House Love here. (Do you think I read enough blogs?) And yes, I have total Moravian Star light envy, but that's another story.

Long story short, I hated the aqua for the front door, but loved it for the laundry room/garage door. DK hadn't extracted any laundry room "no painting" promises, (it's the laundry room for heaven's sake) so I painted a few base coats with paint I had and ran to Benjamin Moore to get a sample of Fairy Tale Blue the day after he left. And I told him he'd have to figure out what I had painted when he came home.With me, that could have been anything. 

I am in love with it, but I can't decide what to do with the wall color, as the many paint swatches indicate. The existing taupe is pretty trashed. And while it looks nice and all, I'm just not a taupe girl.

So that's the rundown. It sounds so much more exciting telling you guys about it than it actually was. 

The funny thing is, the project I am most happy about was 
sorting through all the out-grown, hand me down clothes!

Notice the clear labeling and the uniform containers. It is ridiculous how happy I am about this.

I went through nine big boxes or bins of clothing and trashed or donated 4 bags of stuff, sent some to my sister, labeled and binned the rest for my younger kids as they grow. I have wanted to do this for a YEAR. And now it's done. 

There is such joy in "Done".

What have you guys been doing?

Talk to you soon,
CM Shaw

PS. If you find that I don't talk enough here and you need some more, 
you can follow my Pinterest boards here