

My enthusiasm is due entirely to the piles of stuff that people leave next to their garbage cans. Yes, folks, I am a dumpster diver. I know, you're all shocked that I would stoop to that level and stalk people's trash piles while pretending to be "out for a walk". Alright, you guys have known me for long enough now that NO ONE is shocked, except my mother, and she's probably not even shocked, just hanging her head at all of her wasted efforts to make me a lady instead of a hill billy.
But seriously, people throw away the craziest stuff. I found a totally functional overhead projector in my next door neighbor's trash pile one day.

See how nicely it lives nestled up in my daughter's closet? I really need to move it to the studio.
I'm sure that never happened to me in high school.
Anyway, neighbor's trash heaps can be a smorgasbord of raw materials for your projects. Just ASK the neighbors before you go merrily off into the wild blue yonder with their stuff. It may be a donation they have scheduled, or something. My neighbors already think I'm weird, so that isn't an issue.
So one day, I was eying my neighbor's trash heap and saw a ton of crown molding. Like seven or eight 5-8ft lengths of it. And he was throwing it away! you bet I hustled up to that door and said, "can I have this?" And I had it for 4 years. Sitting on top of the shelves in the studio. Just waiting for The Idea that would transform it from trash to treasure, or at least into something cool.

This is not that set of molding, but you get the idea. These are actually base boards
sitting in another neighbor's yard that I spied on my walk this morning.
One day this last January, I got my idea, a huge magnetic chalkboard. I had a 2ft X 4ft piece of lauan backer board that I was using for my chalkboard and looked up to see the dumpster molding right above my head. Jackpot! The frame I had been dreaming about was $500!
So. Not. Happening.
The molding was chunky, free, already painted, and previously beaten up. Perfect!
Step One: Get yourself a piece of wood, thin, flat, and rigid.

This is a giant sheet of lauan backer board. Mine was about 1/3rd this side.
I used a 2ft X 4ft piece of lauan backer board for my chalkboard. I think it cost about $7 at Home Depot. I wanted something really big that I could use to brainstorm ideas for the blog on. You don't have to make yours that big. I have used framed art pieces before and painted right over the glass. You could make life easier on yourself and just use a piece of metal and skip the whole magnetic paint step. Your base just needs to be clean, flat, smooth, and not too heavy.
Step Two: Prime the surface

I am a big fan of prime. I know all the Annie Sloan people say it's unnecessary, but it makes me feel better, kinda like having tons of money in a savings account. I just think it's a great was to make sure your decorative coats stick to the base you're using. I used Rustoleum spray primer, in grey. I figured that everything on top was black, so I'd go with a darker base. You don't have to use spray primer. I just had some in the studio and I like that it leaves a smooth finish. You could get a nice coat with a roller and Kilz or Bullseye 123. Just add a little black acrylic craft paint and stir it well if you want to tint your white primer grey or blackish. A true black will be hard to get.
Step Three: Roll on the magnetic paint

Magnetic paint is a really cool idea. There are tiny flecks of iron in the paint that build up and create an iron coated surface, which is what the magnets stick to. It is a dark charcoal color, so I wouldn't plan on making a white chalkboard with this product. You need to keep your top coat, ie. chalkboard paint, pretty thin to maintain the magnetic properties. It's also pretty expensive. I think mine cost $19 for less than a quart with a 15% discount. I have since seen it at AC Moore, which means you could use a 40% off coupon.
The magnetic paint I got was from Sherwin Williams (the can on the right), but I have no idea what the actual brand was. It's not obviously marked on the can. In any case, it's just as well because I didn't love this product. It did it's job...eventually. Like 4 or 5 coats later. The can says you need at least 2 coats, so I was ready for that. But I wanted really good adhesion from my magnets. For smoothness, I applied it with a small black foam roller. As it was a pretty big piece of wood, I just painted down the long side until I couldn't reach any more and then walked over to the other side and started up where I left off.
Part of my problem is that I wanted a really smooth surface, so I sanded after the first two coats.
DO NOT DO THIS.
It removes the iron flecks and defeats your purpose. I did several more coats to make up for my mistake.Please note, there is a 24 hour dry time between coats with this paint. So yes, it did take me the better part of a week to do this part of the project. I checked the "magnetic-ness" of the board by putting some super strong magnets I have against it. When they finally held a sheet of paper up, I knew I had enough coats.
Step Four: Apply your chalkboard paint

WalMart.com
I already had the can of Rustoleum Chalkboard paint from making the Barn Sale signs, so there was no cost to me there. I think it cost me $19 at Home Depot 2 years ago. WalMart.com has it for $14.93. I also saw it at AC Moore. So if you buy some, that's an idea of what it will run you.
After letting the magnetic paint dry completely (Please read the directions on the can you get, as various brands may have different drying times, usually 2-4 hours), I used my roller to apply a solid coat of chalkboard paint. There is just something so daring about painting something black. It just feels so final. So committed.
I added a second coat after letting the first dry completely. I think I left it overnight, then painted the second coat. That was dark enough for me. And I was pleasantly surprised that it smoothed the surface out a bit as well.

Because of the iron in the magnetic paint, the surface will NOT be smooth. You have to be OK with this. This photo shows you how the finish turned out. It's not the finish I was hoping for, but it works just fine and doesn't bug me now that I'm used to it.
Step Five: Season your chalkboard
This is a fun step. Once all the paint is completely dry, like "it's been a few days or so since you've painted" dry, then you get to color over the whole thing with chalk. You rub a piece of chalk sideways up and down the chalkboard until every nook and cranny is whitish. Then you wipe it all off and it looks like a real chalkboard.

Here is a terrible picture of mine at this point.
Step Six: Cut your wood for the frame.
 See how the ends turn up? That is a nice place for your chalkboard to rest against.
Photo Source


I used the crown molding I found in my neighbor's garbage heap, but you can use what ever kind of trim you want. I found crown molding helpful to work with because there is a little recess at the bottom of the molding, where the wood cants back a bit to allow it to be installed on a diagonal.
Photo Source
So you figure out how big you want the frame. To do this, measure the outside edges of your chalk board. Then apply those measurement to what will be the inside of your frame. The frame will be larger on the outside than the inside, and the inside is what the chalkboard has to line up with.
I used my neighbor's compound mitre saw to make my cuts, with the blade set on a 45 degree angle, lining up with the mark for the "inside" and then cutting from there. You could use a hand powered mitre box as well, if you don't have your own saw or neighbor whom you can use for their tools handy.
After each cut, I lined the piece up with the chalkboard to make sure I had cut it right. Then I wrote which part of the frame it belonged to on the back of the wood.

When cutting, be as straight and precise as you can. I didn't know the saw as well as I might have, so some of my cuts didn't line up as nice as I'd have liked.

This joint can be filled with wood putty and then painted to make the gap invisible.


If you cut things right, then your corners should look like this when you lay them out together.

This lovely corner is where I ran out of wood. Notice how the actual corner of the bottom piece is completely missing? Always double check your measurements from the bottom (inside) edge and the top to avoid lovely surprises like this. I didn't have any more wood to work with and it was for me, so I'm just living with it to keep me humble.
Step Seven: Screw you wood frame together


Measure the thickest part of the molding. Get screws that are just a hair shorter than that measurement. If you are making a big frame, you will need about 4 per joint. If you are making smaller frame, say 11x14 or 8x10, you could use as few as two per joint.
While you're at Home Depot getting screws, pick yourself up four steel "L" straps. I think they were 4 inches long on each side. Remember, this is a BIG frame. You can get the size that best seems to suit your project. The number of holes in the straps should tell you how many screws per corner you need.
I made sure to mark where the thickest part of the molding was on the back, to avoid drilling a hole all the way through the wood through the front.
Use the L brackets to mark where your pilot holes are going to go. Then VERY CAREFULLY drill the pilot holes, using a bit that is smaller than your screws. It is better to go too shallow, than too deep.
Once the pilot holes are drilled, lay out your L bracket in place and screw in the screws through the brackets and into the holes. Periodically check that you are not coming through the front. Repeat this for all four joints.
Initially, I glued the frame corners together and clamped them overnight to strengthen the joint, but some of the joints came apart anyway when I started drilling screws in holes. Gluing has almost always made a stronger joint for me, but this time it didn't seem to make much difference. I just used a regular wood glue.

The white squares on the L brackets are spacers, because my screws were just a hair too long. I just cut 1/2 inch pieces of mat board and poked a hole through them, then twisted them onto the screws, then screwed the screws into the pilot holes.
Step Eight: Put your chalkboard into the frame.
Once you have your frame built, it's time to add the chalkboard. Lay the frame out on a flat surface, face down. You can see the grove where the board will rest all ready to hold the chalkboard in place. Lay the chalk board face down into the groove. Due to the grooves, it should lay pretty flush with the back of the molding.
Because you are telepathic, you will have read this whole post before going to Home Depot and will also have bought 4 straight steel straps like this:

Here's the picture from above. It gives you a better idea of what the whole strap looks like.

I think they were about $1 each.
I ran out of screws, because I am not telepathic and had not read this blog post yet, hence the dark brown screws pillaged from my tool chest in a frantic effort to avoid yet another trip to Home Depot, which is a 15 minute drive each way from my house. So the moral here is don't forget to buy the screws for your straps. (Hmm.. that sounds kinda kinky, doesn't it?) You will need two screws for each straight strap.
Lay your straps out and mark where the holes will go, taking care to mark where the thickest part of your wood is.
Drill your pilot holes VERY CAREFULLY, and then replace the straps, put screws in the holes, and have at it. Once again, checking every so often to be sure your screws haven't punctured the front.
Now all you have to do is carefully turn it over, check that it's stable and

YOU'RE DONE!!!
WOOT.
Now you get to add magnets.

I find the small "super" magnets from WalMart or the
strong ceramic magnets from craft stores work best.
And papers.

And go merrily on your way.
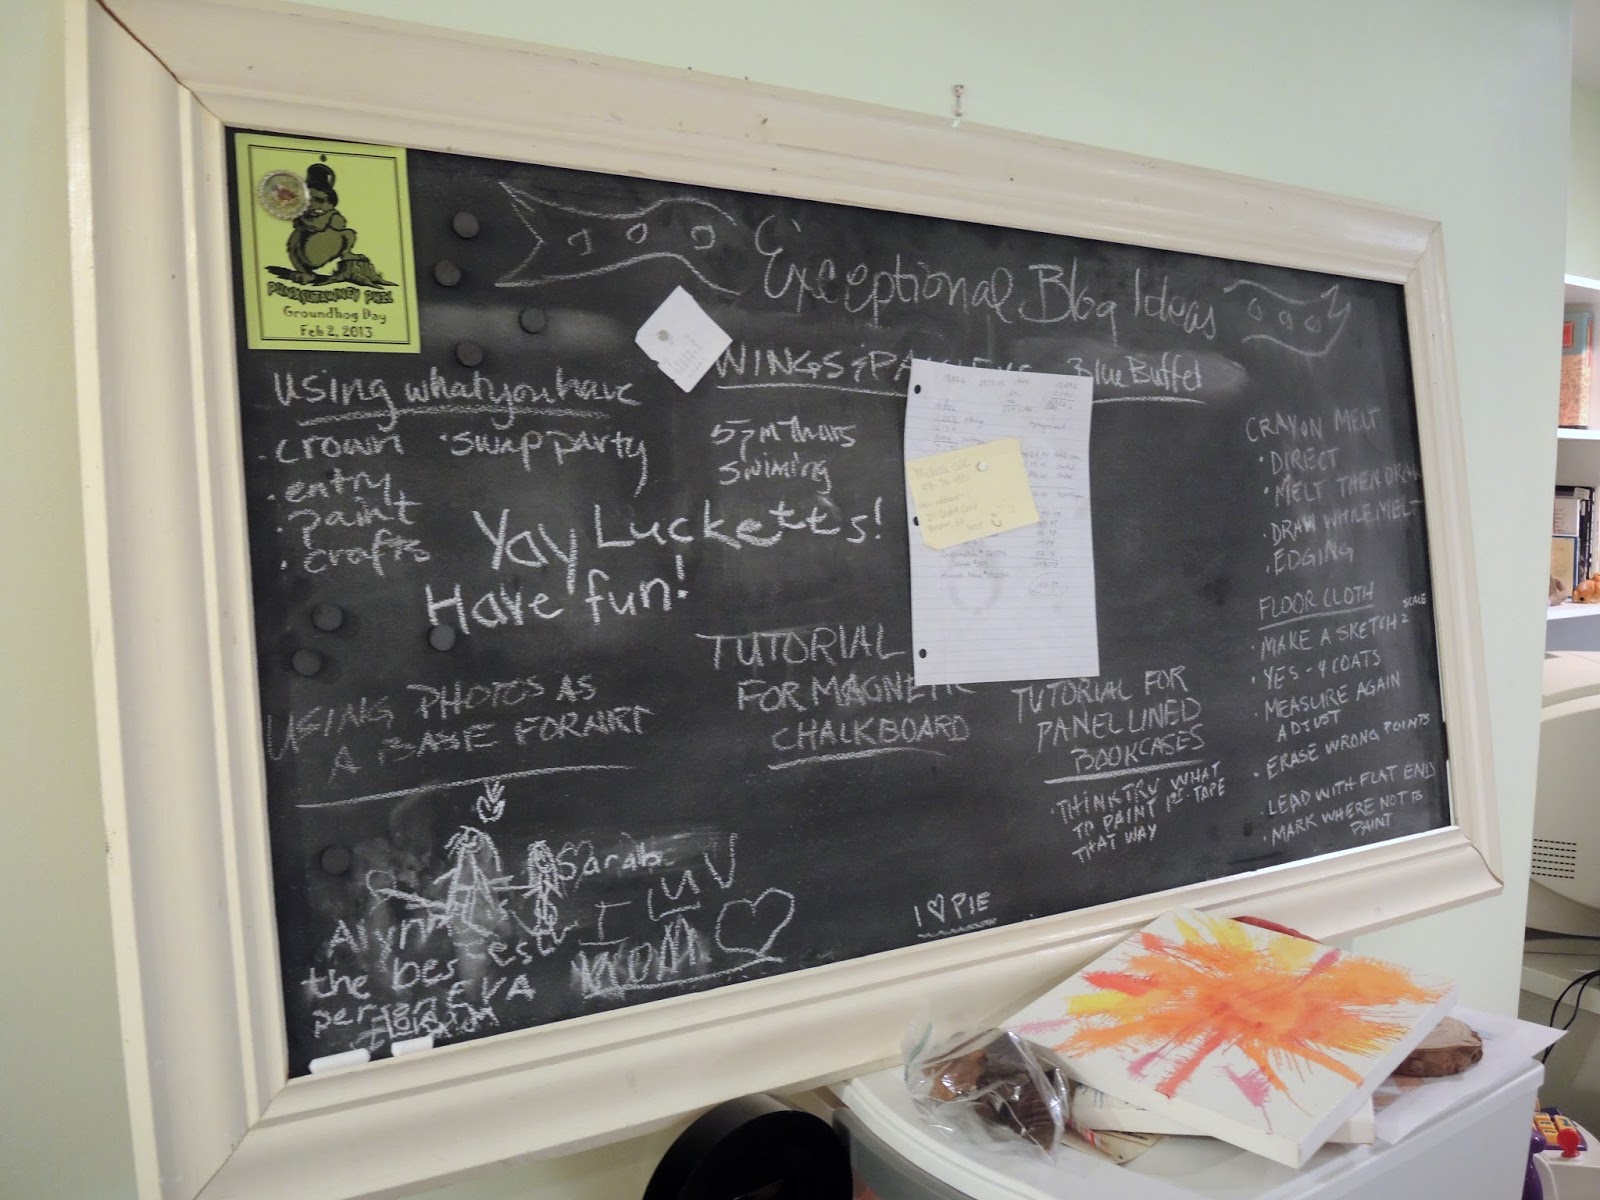
I love how it turns out. It is really beautiful. And it is really a great place to write your menus and maybe some reminders. Thanks for sharing this idea.
ReplyDeleteLyt.com
Thanks so much Jelly! I appreciate you stopping by.
DeleteThe information you shared through your post is functional. I admire your work. Wish you all the luck for all your blogging efforts. Install Crown Molding
ReplyDeleteThanks for reading Sheldon. Maybe you could give me a few tips on cutting my crown molding a little straighter. Will be checking out your site shortly.
DeleteCM Shaw
Thanks for the inspiration. I'll definitely be using this for our new office/homework room redo..
ReplyDeletePicture Framing London