I love plants. They are the heart of what I create and they just make me happy. So of course I have many gardens. Or rather, I used to. You see art-ing and barn sale-ing take a long time and lots of my energy. My garden has suffered for this.
But not this year! This year, I am hoping to again have a floral utopia on my deck and a bountiful vegetable garden in my yard. I have BIG plans.
Unfortunately, I am still broke.
And this is what I am currently working with.
The bin idea was great when I started. They are light, fairly cheap and huge. But over time, the sun breaks down the plastic until it becomes brittle. These are cracking down the sides, and split if I try to move them.
Undaunted, I put down my plant catalogs and went to my studio to see what I had
there. There was exactly ....NOTHING that could help me.
This was
actually a first for me. The Stash has never let me down before.
So I
did something shamelessly self serving. I
bribed traded my father-in-law my
tickets to the second round of the NCAA basketball tournament (and a chance to hang with the grand kids during spring break) to
come and help me build a new deck planter out of 2x4s. The man lives in
Idaho, which, for the geographically challenged, is on the
opposite side of the country from Virginia. It worked. He showed up.
HOW TO BUILD A 4FT X 2FT DECK PLANTER OUT OF 2X4S
1.
FIND SOMEONE TO HELP YOU. This is not a one person job.
You will swear a lot and potential hurt yourself if you try to go it
alone. If you don't have basketball tickets, beer and pizza might do the
trick.
2.
DRAW UP A SKETCH OF WHAT YOU WANT I
knew I wanted the planter to be 4 ft x 2 ft, just to take advantage of
the 8ft length of the planter and cut down on how many cuts I had to
make. Think through everything. How you want the corners to line up, how
you want to attach things, how the bottom will be attached, to mitre or blunt joint, EVERYTHING. It will save you a bunch of time and frustration and trips to the store later. It's a lot easier to redraw something than to re-cut it.
Our plan was to go with a 4ft front, 4 boards high. The sides would be 17.5 inches long to accommodate the 3.5in width of the 5 boards we were using for the bottom of the box. There were four 21.5in boards running the width of the bottom of the box for drainage, base support, and air circulation. And their were 4 interior support boards cut at 14in high to secure the side and front boards to for stability. That was the plan. We did end up changing a few things.
3.
BUY YOUR WOOD AND DECK SCREWS. Be sure that you have added up all the lengths that you need and planned for overages. We bought eleven 2in x4in x8ft planks of
pressure treated lumber. (Remember, this stuff is going to have wet dirt sitting against it for 15 years. If you are doing a vegetable planter, you might use cedar or something guaranteed non-toxic for your wood) We got the "B" grade, but ended up being charged for the "Prime" grade as the one tag the cashier used happened to be a stray prime board. Bummer. Just buy the prime stuff. I think
it was $3.99 or $3.69 ea vs $3.29 at Home Depot for the funky stuff we used.
We bought a box of Pine colored Deck screws size 9 and 2.5 inches long for $9.99. The box had one screw left when we were done. We got lucky, but I had some other deck screws at home if we needed them. If you don't know how many screws you need, buy two boxes.Then you're covered. You can always return an unopened box if you keep your receipts. Better than being mid project and having to run all the way back to the store.
These screws were star tipped. This isn't mandatory, but it makes them harder to strip out, which is a really nice feature. You need a star sharped bit to drill in a star shaped screw.
Fortunately, the box came equipped with one. You need to check what kind of head your screws have and be sure you have a bit that you can use with them. If there isn't one in the box with the screws, they sell a million and one bits in the tool department for fairly cheap. You'll be glad you have it.
4.
CUT YOUR WOOD. This process is made exponentially easier with a power saw. We used my kind neighbor's compound mitre saw, which I highly recommend. If you don't have a saw, Home Depot or Lowes can cut your stuff, but there are a lot of cuts for this piece, and they might charge you by the cut.(Then again, they might not, if it's a slow night and you show a little cleavage.) You could also use a mitre box or hand saw. That would take a while, but it's a cheap option.
We started by cutting the long front sides as we were sure they would all be 4 ft (48in) long. When we had all eight pieces cut, we measured five of them laid side by side to see if our width for the box bottom really was 17.5 in. it wasn't. it was 18.25 in. So If you have a question about length,
MEASURE FIRST, THEN CUT. We made sure to lay out the cut boards according to size. And once we were done cutting, we
dry built the box boy stacking the boards to be sure everything was a nice, tight fit. This also gave us the opportunity to measure the interior lengths we would need, which ended up being different than we had planned.
For the base, you need to make two boards 3in shorter, to accommodate the support piers. The three middle boards are the full length of the box INSIDE the sides.
5.
SAND THE BURRS OFF AND SMOOTH THE ENDS OF ALL YOUR BOARDS. You don't want to be admiring your flowers and then get a sliver. I had a sanding sponge lying around, but any bit of sandpaper should do. I'd go with 150-220 grit. But as long as the burrs are gone and the ends aren't rough, you did it right.
6.
BUILD THE BOTTOM OUTSIDE FRAME FIRST. We started here, because we had to flip the whole thing over to attach the support feet, be we wanted to be sure that the bottom pieces would still fit nicely. We drilled pilot holes through the front boards (the long ones) and into the side boards (short ones) about half inch from the lip and edge, making sure to leave a large enough gap for the screws that would be going through the sides into the supports. Then we screwed in the deck screws. We ended up using two drills, one with a drill bit for the pilot holes and one with the star screw bit. This was an awesome system, but you can just change back and forth also.
Once the frame was secure, we just laid in the base boards. There is nothing holding them in place, but pressure. (I wanted to be able to remove and swap them out easily if they rotted over time.) Fortunately, it was a very snug fit.
Happily, we screwed the vertical support boards in place with one screw, with the intention to add another after we made adjustments once the whole structure was built.
Here you can see better. Sort of. The front stack of screws is vertical. The side stack of screws is horizontal in between the other ones, so they all fit without hitting each other.
7.
CAREFULLY TURN THE PLANTER OVER AND ATTACH YOUR SUPPORT BOARDS. The planter will already be heavier than you expect. Sorry. I forgot to shoot this step, but you can see the feet poking out there on the left.
Since our base boards fit tight, we just left them in place, If yours are a bit loose, you can take them out and just put them back in when you're done. We just screwed the supports into the frame, since they would be resting on the ground with a about 200lbs of dirt sitting on them.
8.
BUILD THE NEXT LEVEL OF FRAME STARTING WITH THE SIDE BOARDS. We decided to go with this approach so it looked pretty from the front, with all the screw holes aligned. We dry lined everything up and then screwed the side into the support and then the front into the side. It worked fine, but I'm not sure there isn't a better way. We ended up putting it back down on the feet and screwing things in sideways, letting gravity help hold things in place.
This is what it looked like after 2 courses. Front into sides, sides into supports. Nice and snug.
Oh and I think this is about where the cordless drill batter ran out.
Make sure you have more than one battery for your drill fully charged. We ended up borrowing a corded drill and using the cordless one once it recharged.
9.
ADD THE THIRD COURSE OF BOARDS, THEN ADJUST THE SUPPORT BOARDS. One more round of Front into side, side into support boards. Once the third row was stable, we unscrewed one or both of the screws in the support boards and pulled them up straight against the sides. Then we added all the screws back, so that each side piece had two screws going into the support boards.
10.
ADD THE LAST COURSE OF BOARDS. You totally need two people at this point to hold and tweak and pull things straight and together. We even ended up raising one course just a hair, to make the support board flush with, rather than taller than the top course.
11.
FEEL CRAZY PROUD OF YOURSELF AND POSE WITH YOUR PLANTER. I never quite get over the rush of building something out of simple materials that just started out as an idea. It's just so stinking cool!
BUT WAIT!
YOU"RE NOT QUITE DONE YET
12.
PLACE YOUR PLANTER BEFORE YOU PUT ANYTHING IN IT. These suckers are pretty heavy once they are finished, but they will be immovable with dirt in them. Do your pushing and poking before adding anything.
DK, "Man this is heavy! How many 2x4's did you use?"
Almost there.
Oh wait, just a bit more.
Just right!
13.
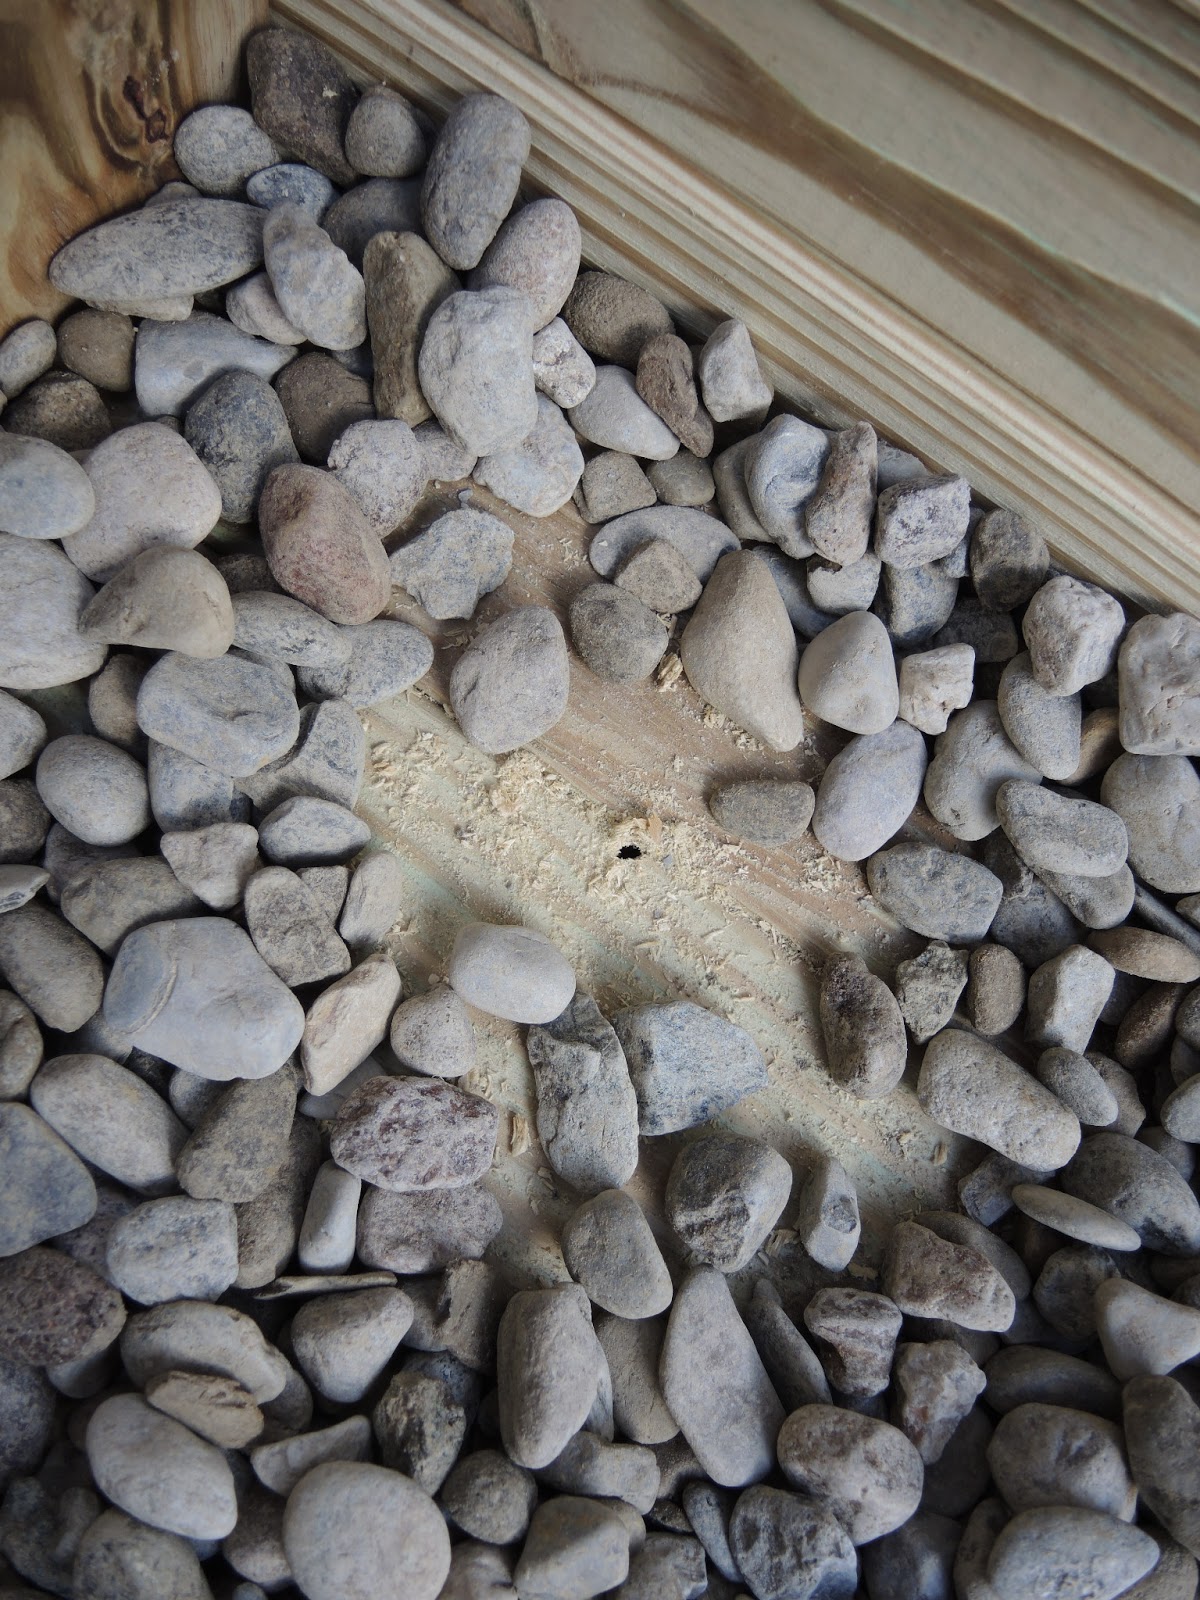
DRILL DRAINAGE HOLES IN THE BASE. Using the largest bit that will fit in your drill, drill about 8-12 drainage holes, avoiding the base legs and thinking about what's below your planter. You want to drill when things look like this picture. I got a little excited and ran out to get drainage stone, then filled the base with said stone, then thought "Hmmm.. there are no drainage holes here. Crap!" Hence, the example of What Not To Do picture below. It worked, but it would be better and safer to drill BEFORE adding the drainage stone.
What Not To Do. But at least you can see where I put the holes and how big they are. And at least I remembered before putting in the dirt. Whew.
14.
ADD YOUR DRAINAGE MATERIAL. This just gives the plant roots a bit more space from sogginess. It may help keep persnickety plants alive during a really wet summer. I bought two 50 lb bags of 1.5 inch river rock, but only ended up using one of them. If you want more than one inch of drainage or your planter is bigger than mine, you'll need more rock.
15.
ADD DIRT AND PLANTS. Here is the planter all ready for dirt. I added a bunch of the dirt from my bins, plus a bag and a half of those huge bags of Miracle Grow potting soil from Costco. They're like 2 cubic feet, weigh a ton and only cost about $11. But you can add whatever miracle mix you put in all your outside pots. There are a million and one recipes for potting soil online.
16. ENJOY WATCHING YOUR PLANTS GROW. I happened to have a pair of mature clematis vines living in my vegetable patch, taking up too much space, so I moved them up to the new planter. I am completely in love. And now I have room in the garden for my snap pea trellis.
There are also tulips and blue and white hydrangea shrubs. The hydrangea will eventually move elsewhere, but I think they'll be gorgeous there while they are still small.
I may stain the planter when I redo the deck. but for now, that's how you make a planter out of 2x4's. Enjoy!


That looks fabulous!! I will have to make one someday! And I am selfishly glad that said father in law lives down the street from this daughter in law....especailly since I don't have any bribery tickets! ;)
ReplyDeleteThese are great! I love making stuff when I can (instead of buying it). Well done and smart to bring in the Father-in Law!
ReplyDeleteAshley Rane Sparks
www.makeitrane.com
Thank you for the helpful directions. I modified them slightly to build a 2ft x 2ft planter instead. My girlfriend was pleasantly surprised as this has been on my "honey-do" list for several months. Thanks again.
ReplyDeleteThis comment has been removed by the author.
ReplyDeleteThanks for these instructions. I modified mine a bit. I used recycled redwood 2x6 decking. And I put a little trim lip on top using decking spindle. It came out alright for one of my first projects. Thank you!
ReplyDelete