
After a few feverish sessions looking for moss sources online, I discovered this little company called Moss Unlimited in Forks, WA. Forks is located near the only temperate rainforest in the United States, and, as any good rainforest should, they have booges of moss there. So much so, that Moss Unlimited can sell it by the box load. I went with the dried sheet moss described here.

Now this might not look like much to you, but this is actually a pretty big box. (24in x14in x12in, to be exact.) You could fit a side table in it. My five year old uses it as her "bed" in the basement when she and her sister play house. And she fits with room to spare. I think the whole thing cost me around $45, including shipping across the country.
OK, so you take the plunge and your huge box of dry moss shows up. Now what do you do with all your 2 ft long pieces of gorgeous moss? (I swear about 80 people asked me that when I told them I had a huge box of moss in my garage.)
Actually, I've made up a neat little list of idea for you. Wasn't that nice of me? Actually, I've had a year to play with the stuff and this is what I've done with it.
1. Create a very dramatic table scape.


These shots were from the 2012 spring barn sale. More pics of this show here.
Now I never had any intention of eating off this table, but if I did, I might confine the moss to the center, where my utensils weren't sitting directly on it. if you're worried about damaging the finish or something, you could even put it on an old cookies sheet, with some moss scraps trailing over the edge to hide the metal. It would look cool with a huge flower arrangement on it, or just a few forced bulbs here and there.And nests. Nests look cool with moss, pretty much always.
2. Do a fantasy spring display on your mantle.


Just start by plunking down your moss on the mantle. If you are worried about scratching a finish, then line it with paper or fabric first. You can tear the moss or stack it to suit your needs. Then just pile your stuff on top of it. I found it was hard to get the lighter weight things like the orchids, to sit level. So I tore a hole in the moss and fit the orchid in the hole.
3. Use the moss to make your forced bulbs
and potted plants prettier.
Until forcing bulbs start growing, they can can look a little stark. If you nestle the bulbs between a bit of moss, on top of the rocks, you have green to look at from the get go.

Moss also makes a nice cover for dirt in pots as well.


Moss also makes a nice cover for dirt in pots as well.

If you've never forced bulbs before, you should try it. It's really easy, if you get the right bulbs. I used paper whites. You can buy them in plant nurseries or even at the grocery stores around the Holidays.
Once you have your bulbs, you put them in a container. You don't need any dirt, so anything with a side to hold in the water will do. I used an apothecary jar because I don't like it when the greens flop. But you could even use a tray with sides and just tie the greens up when they get too long.

You can start with rocks to stabilize the bulbs, or just moss, like the picture above. Break little holes in the moss to act as a support for your bulbs. Sneak them into the holes and then water until you can see your bulb has about 1/4 to 1/2 inch of water up it's side. And then just wait.

Pretty soon you'll have a jar full of flowers!
4. Line your cloches or trays with moss.

See how it just gives a little extra something to that glass cloche? There's nothing else inside. But that little hit of green and fluffy texture catch your eye.

Shh...Don't tell DK I borrowed his nice camera to shoot this.
See how happy King Rupert is on his perch of moss? But a vase full of flowers would also look amazing. Or even something as simple as a white bowl full of clementines.
One downside I have noticed with this particular variety of moss is that loses its green, and gradually fades to a more olive-brownish color in the sun. So if you want it greener for longer, keep it out of bright light. The stuff I have been careful with still looks like it did a year ago.
5. Use moss as a surprise element to your display shelving.

Here I just lined the shelves of an armoire with it and staged a bunch of pretty ruffled white wear. I love how it makes the white jump out so you see the ruffles. And it''s so pretty with the silver on the shelf below. There is just something that makes me giddy about putting the rustic and the refined together.

Here it is by itself. You could add any number of things to it. Add old books as a platform for smaller things. A nest. Some pretty silver candlesticks. White ceramic animals. A bird house. Twig balls. Your collection of milk glass. A glass cloche bearing some fabulous treasures. You know, now that I think of it, all those things could look really cool together on a moss covered shelf. (Oh wait. That's my mantle I'm thinking of, isn't it?) The possibilities really are are only limited to your imagination.
6. Make your own kokedama
(Japanese for "plant wrapped in moss and twine")

image from flor de planta.com
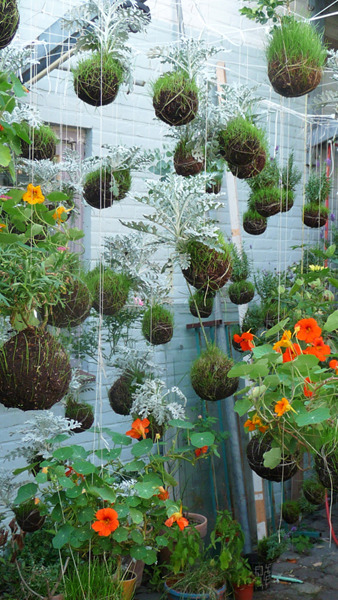
image from the collection of nopenothanks on tumbler.com

image from here
These are the coolest things! I haven't had time to make one yet, but I
still have just enough moss. Maybe I'll make some to sell for the
Luckett's Fair.
The process seems pretty straight forward:
1. Find a plant small enough to fit in a ball of dirt and hang by a string.
2. Wrap the bare roots in moss and wrap with cotton string.
3. Make a round dirt ball with moderately wet soil
(you'll have to check other tutorials for recommendations of what kind to use)
4. Make a hole and put your root ball in the dirt ball.
5. Wrap the dirt ball now containing the plant with moss.
6. Wrap the whole thing together with string.
7. If you want it to hang, now is the time to figure that out.
Here is an awesome tutorial from AtelierChristine.com.
Here is another one from The Gateway Gardener.com .
Both are way better than mine so check them out, maybe before you start making your dirt balls.

So there you have it. 6 Amazing ways to use your box of moss.


Unfortunately, my box is now empty. I guess I'll have to head back to Forks.
++++++++++++++++++++++++++++++
BTW I was not sponsored or paid in any way for this post.
I just had a ton of fun with my moss and really like the folks at Moss Unlimited.
Who knew you could do so much with MOSS! I am stunned that you --- well everything!! It is just one more reason you are my decorating diva!
ReplyDelete